
When I found this fun plastic Little Tikes dollhouse on FB marketplace for only $20 I knew I wanted to give it a makeover and breathe some new life into it. The dollhouse was stained, dirty, and looked old and tattered when we picked it up.
I’ve been seeing playhouse farmhouse makeovers all over the internet, so I thought why not do the same to this dollhouse. And so the DIY Dollhouse Makeover project began. All you need is a screwdriver and some spray paint to complete this makeover.
BEFORE


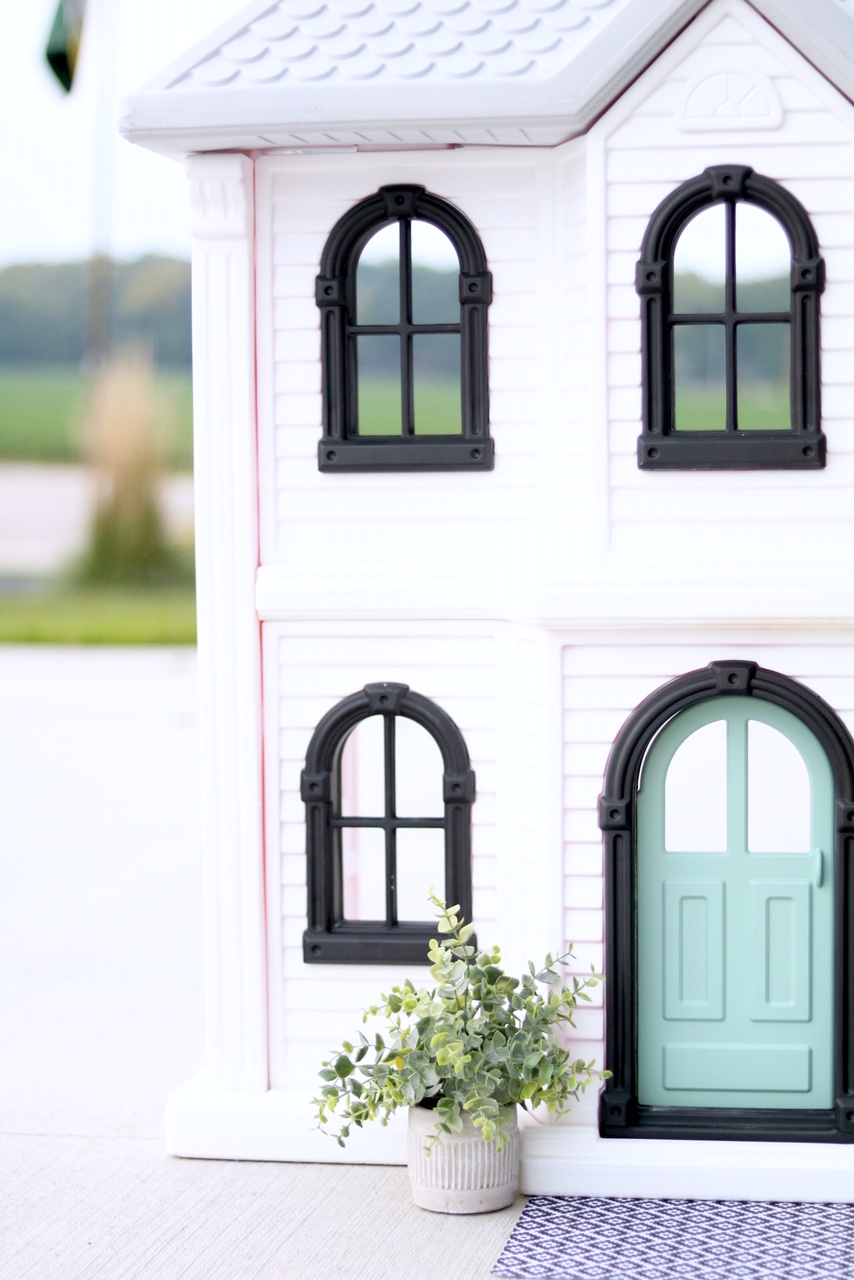
AFTER


This post contains affiliate links.
DIY DOLLHOUSE MAKEOVER PAINT
- 1 can | Rust-Oleum Chalked Spray Paint Aged Gray – Roof
- 1 can | Krylon Spray Paint Matte Black – Windows
- 1 can | Krylon Spray Paint Catalina Mist – Door
- 5 cans | Krylon Satin Bright White – Everything else


DIY DOLLHOUSE MAKEOVER INSTRUCTIONS
I started by taking the house apart with a screwdriver and then Evie and I gave it a “car wash” outside on the driveway. We let it dry completely and then a few days (or weeks) later when I finally got around to it, I spread the pieces out and began spray painting.
Note that the bottom of the house remained attached to the floor piece.I only took the top floor and walls apart for painting. I removed all of the windows and door trim as well.
Make sure you paint in light layers and let them sit at least 10 minutes in between spraying so you don’t get runny paint. It’s VERY tempting to just keep going and try to cover the color right away.
The bright pink house was hard to cover with white paint, so I ended up making two extra trips back to the store and using five cans of spray paint to cover the bold color.
In the end, it was all worth it and really not that hard to do if I would have had enough spray paint to begin with. Now this DIY Farmhouse Dollhouse Makeover is complete and ready to enjoy! And, I don’t mind one bit that it actually looks cute in my house! 😉
Check out even more DIY projects on my blog here!

Pin It!

How adorable! It’s amazing what paint can do! Excellent transformation 😊
Thanks Mallory!!!
It looks so great!! Great idea!!
Thanks Tara!!!
I absolutely love this! You inspired me to do the same for my daughter! Where do you get all of the small adorable accessories like plants and rugs? I am thinking that this would be her Christmas gift!
That would be an awesome gift! I got the little “rugs” from the felt aisle at Hobby Lobby. It’s a paper sized piece of felt. And I got the plants at TJmaxx. I actually have them all over my house. Lol! They used to have a ton of them.
Felt!? Wow. I would never thought of that. You are creative! Thank you! ❤️
You’re welcome! Evelyn actually came up with it when we were at the store together!
I love this idea and am thinking about doing it for my girls. How has the paint held up for you and would you recommend using a primer?
The spray paint has paint and primer in one! I think it has held up great! No complaints.
Can you show a picture of the inside? What’s your plan for that space?
I showed it in my IG Story and it’s still posted in my highlight reel if you want to check it out! I don’t have a plan for the inside. I just painted it white and the kids put whatever toys they want in it. Currently, it consists of fences made out of wooden blocks and lots of little play animals. It’s basically an Animal House! Ha!!!
So beautiful!!! I have the same doll house and am curious how you did up the inside??? Thank you!
Thank you! We bought more felt “rugs” but it’s just white and the kids put different toys in it. I left that up to them!
Did you also take the roof apart?
The roof is just one piece and pops off, so yes I did remove it, as well as all the top floor pieces. The bottom floor walls, I kept attached to the base. 🙂
How did you remove the door frame from the bottom floor? I was able to easily remove the windows but am struggling with the door and door frame.
Hi Megan! I don’t remember that part being difficult so I’m not sure what’s going on with yours. Some of the screws were warped in the windows so I had to have my husband help maneuver them out! Good luck! Tag me in your after if you post it!
I have the same dollhouse. I’m going to do the same as you thank you for the great idea your the best ‼‼
Love it! It takes some work but it’s so cute in the end!
i am going to paint the dollhouse today with my parents!
do you have any good ideas for any furniture ?
Here is a post on painting dressers! https://sugarmaplenotes.com/2015/11/15/refurbishing-childhood-dressers/
thank you
How well has this held up? It’s so pretty!
Thank you! No wear or tear so far! It’s held up great!
Curious about the inside! I’m having trouble finding cute Barbie furniture for an updated dollhouse like this!
I don’t have any furniture in it either! My daughter has it lined with barbies and animal setups. We also grabbed some felt squares from the craft square to use as rugs.
Just found your adorable makeover on Pinterest. I have a question about using spray paint for this. Last time I used spray paint was for a costume and the residual odors were so strong it was intolerable. Can you still smell paint odors? If not, how long did it take for the odors to dissipate?
I did all the spray paint outside and let it air dry out there. I didn’t really notice any scent after we brought it inside!
I just got this house for my daughters. Can I ask why you did not use the Rustoleum for all and did some with that and some with the Kraylon? Thanks!
No reason other than liking the colors and matching paint I already had some of!
I just bought one of these houses from the marketplace on Facebook. I’m gonna be making mine into a haunted house but I sure do love yours! Makes me rethink the haunted house idea lol
Ooooo how fun! You could paint it something that goes year round and just add spider webs and other spooky decor for halloween!
Thank you so much for the inspiration! I used my daughters old playhouse and turned it into a new one for my granddaughters.