
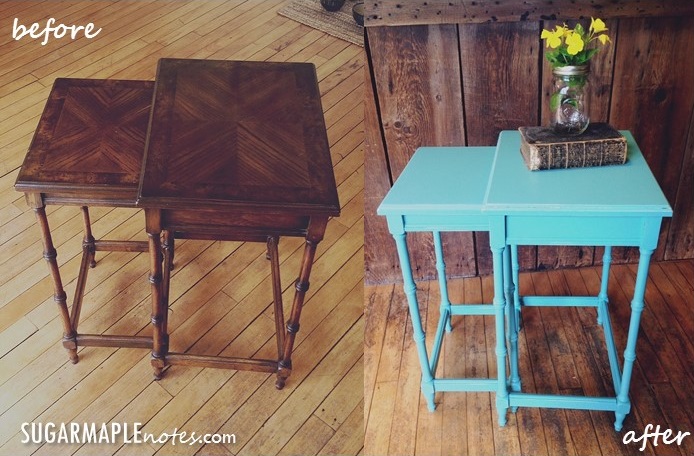
Inspired by Pinterest, HGTV and all things DYI, I decided to give a makeover to a pair of nesting tables my mom was ready to give to Goodwill. They were sad looking little wooden tables that needed to be brightened up and brought back to life. I headed to Menards and picked up the following supplies:
- Paint tray
- Rubber sanding block
- Sandpaper sheets ~ assorted grit
- Foam paint brush ~ 3 inch
- Quart of custom colored turquoise blue paint
Step One: I began the project by attaching a piece of sand paper with a heavier grit to the sanding block and sanded the top of the table in even strokes until the shiny veneer was completely gone. It was awkward to sand the detailed spindle legs with the sanding block, so I took another piece of sand paper in my hand and sanded the legs without the block. It was easier to get into the tiny grooves that way.

Step Two: After removing the glossy finish with the sand paper, I wiped the tables down with a dry cloth to remove the sanding residue. Then I painted the tables with three coats of my custom turquoise blue paint. I figured three thin coats were better than one thick, drippy coat. (Think about painting your nails – multiple thin coats look better and you don’t end up with a goopy mess all over your fingers.)
Paint Tip: The lady working in the paint department was very helpful with answering my questions about choosing paint. I told her I didn’t want a high gloss look, but she advised choosing at least a satin finish instead of a flat finish to help protect the paint. I went with Dutch Boy paint because it has a convenient screw-top container and is self-priming.
Step Three: I let the tables dry overnight. Then I attached a new piece of fine grit sandpaper to the block. I’ve read that using a finer grit will allow for a more natural distressed look. A heavier grit could end up making the tables look scratched up instead. I sanded the areas that would most naturally become distressed over time – corners, legs and edges. Voila… the results are in!


By saving the nesting tables from being given away, I was able to create a touch of rustic-luxe charm for our home. It’s amazing what a little makeover can do!