
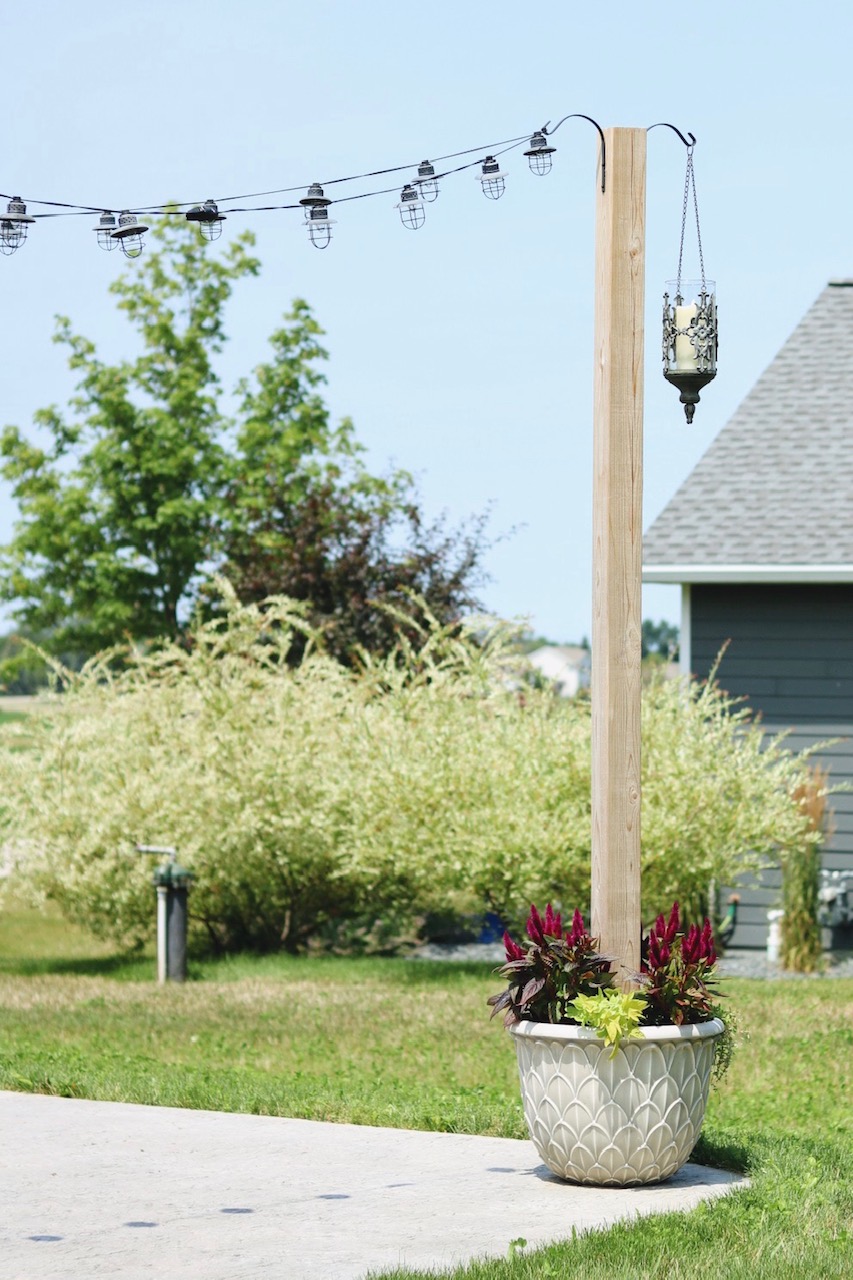
I knew I wanted string lights implemented into our backyard patio somehow, but I wasn’t quite sure how to hang them above our uncovered dining area. We decided to build DIY planter posts to serve as a hanging point for our string lights and it turned out SOOOOO good!


How to Make DIY Planter Posts for String Lights
Materials Needed:
- Large Planter at least 20”Wx15”H
- Quickcrete ~ 100lbs
- 8ft Cedar Fence post
- 2 Hanging Plant Brackets
- 2 L-brackets
- Drill
- Level
- Hanging Wire
- Wire Cutter
- String Lights
Note: Make sure you scroll all the way down to see the nighttime view of the lights!
SHOP THE POST
[show_shopthepost_widget id=”4165702″]Choose an outdoor planter that is resistant to cracking. I recommend picking a planter that is either made of resin or wood. Stay away from ceramic or terracotta for this project.
Step 1 – Screw two L-brackets onto of the fence post flush with the bottom. Place post into the center of the planter and screw the bottom of the L-brackets into the planter.

Step 2 – Add your Quickcrete and water as directed on the package into a wheel barrel or bucket. The more water you add the longer it will take to dry. Mix with a metal shovel.

Step 3 – Pour wet Quickcrete around the post into your planter about 3/4th full. That will leave you with enough room to add soil and plant your plants. Use a shovel to work it around the post so that there are no air gaps and smooth the top. Use your level to make sure your post is straight and check it often while the Quickcrete is drying as the post can shift.

Step 4 – Once dry, grab a ladder and screw in your hanging plant brackets to opposite sides of the post. You’ll use one side to hang your string lights and the other side to hang a plant or lantern.

Step 5 – Use metal hanging wire to attach the string lights to the soffit of your roof line. We have an electrical outlet at the top of our roof line that we plugged into. You might need to use an extension cord to get power to your lights.

Planting Tips – Drill small holes into the sides of your planter for water drainage where your soil will be. Fill plant with soil and plant your desired plants. I love using potato vines so they hang beautifully over the planter and then something taller with color!
Check out more views of our patio below and how the string lights really define our outdoor space and add a cozy ambiance at night! More patio sources are listed at the end of the post.


SHOP OUR PATIO
MORE PATIO POSTS
Pin to Pinterest!


I love the idea of using planters for string lights! Very creative. Thanks for sharing!
You’re welcome! Love getting creative 🙂
I have been looking for a way to use string lights on my patio. This is the perfect solution. Can you please tell me the dimensions of the planter you used?
It is 20”Wx15”H 🙂
Can I use resin planters??
Yes, that’s what I used! Any non-porous material can typically survive winter.
How can I stop my planter from blowing over in high winds. They are in place and and I’m ready to gang the string lights buy yesterday one if the poles blew over.
We have high winds too and it only blew over one time in a really bad winter storm. Is the planter at least 20” wide? Does the concrete fill over half of it? A wider base will also be more stable.
What length and kind of screws did you use into the posts and into the resin planter?
They were short since you wouldn’t want them to poke through. I’m not sure what we used. Maybe 3/8”?
Nice job on the write-up and end result! I tried my hand at this over the weekend and the tension on the poles is too much when trying to have the lights not drooping down at head level. I think after reading yours and the comments, my planter may be simply too narrow at the base. It’s more narrow at the bottom and gets wider towards the top. So I will have to start all over again but atleast this post helped me realize what it possibly was!
Matt – I will update the post to add a note about choosing a planter with a wider base!
*Update* Mission accomplished with the wider base! It’s great and the only struggle I had then was the light strings when one plugs into the other, it was falling out but I was able resolve that by speedwrap cord connector. That keeps the lines tight and it’s black matieral so it’s not noticeable really.
Hey! I might have to get some of that speedwrap! We used black electrical tape! Lol 🙂
I used that at first but it’d still just ever so slightly slide out, just enough to make that 2nd strand not work.
Thanks again for the write-up!
Those posts do not look cedar, they look pressure treated.
Can either one be used?
We didn’t seal or stain the cedar, so it’s faded. But we did use cedar as it’s lower maintenance and typically lasts longer above ground, but I’m sure pressure treated would work fine. I can’t speak to it’s longevity! 🙂
I used pressure treated and so far so good, I did stain em.
This is my gift/project for Mother’s day! I’ll let you know how it goes!
Make sure your planter has a nice wide base so it doesn’t blow over! Let me know how it goes!
Do the pots have a way to drain extra water?
We drilled holes in our planter in the sides where the soil is! 🙂
Looks great. Just a quick question, does the guide wire run the entire length of the string lights to relieve lateral tension or was it to just connect to the roof of the home?
Thank you! We only used it to connect the lights to the soffit of our roofline only. 🙂
How did you hold the post in place while the quickrete dried?
Check out step 1 which explains how we secured the post to the bottom of the planter 🙂
What was the length of your strand and how many sets are you able to string together? We’re the L brackets that you screwed into the pot necessary if you opt for quick setting concrete? I assume the bracket just helped keep everything level while the cement settled right?
The L brackets were used to keep everything level and hold the post while the concrete set. You’d probably have to hold the post while it dries if you don’t use them. Every string light set is different. We have three sets at about 11 ft each. I’m actually thinking about buying a set that is 48’ long so I don’t have to see the connections! This one: https://rstyle.me/cz-n/d8f2x3cn3px
Hi Sarah,
Beautiful work you have done ! I have a question for you regarding the length of you lights. Lights come in 24′, 48′ and 100′ lengths. The area I am looking to cover leaves me with between 10-15′ extra. What do you do with the excess light length ?
Thanks ! Andy
We purchased two smaller sets that are 11ft each and connected them together. We secured them with black electrical tape so they wouldn’t pull away from each other. Similar to these… https://rstyle.me/cz-n/d7ucxicn3px
2 Posts are up! It was faster than expected. We ran out of cement for the 3rd one. Ours took a bag and 3/4 per pot. (https://www.homedepot.ca/product/southern-patio-20-5-inch-whiskey-barrel-resin-planter-in-kentucky-walnut/1000854469) For all the Canadians…
Just used a small dollarstore hook, until I decide exactly what I want.
Wish I could send photos!
Are you on Instagram? Send me photos there so I can share! @sugarmaplenotes
Hi! We are planning on doing 2 of these using the wine barrel planters you had linked…….so do we need 200lbs of quickcrete? That just seems like SO much – but I know nothing….this will be my first dyi project.
Kara
It sounds like a lot but an 80lb bag is actually pretty small and it doesn’t weigh 80lbs when it’s in the bag. We used more than one bag so I guesstimated 100lbs. 🙂 Good luck!!!
When I completed mine, I used 125lbs each pot because I didn’t want to have any issues with blowing over so I went a little more and it’s fine, I still have about 7 inches of soil above that in my pots. We have lavender and some yellow flowers there just fine.
Yay! Glad the project worked out!
Thanks Sarah for the great idea!! I took on this project as a Mother’s day gift for my wife because we have had a problem with trying to decide what to do to hang our lights in our backyard. Your project worked great and I can send you the before and after photos if you ask. I am not on social media and this does not have a place to attach the photos. I really appreciate the great idea. My wife was blown away!
That’s so great to read!!! I’d love to see! My email is sarah@sugarmaplenotes.com
Using the 4 x 4 posts with the 6 inch brackets that you posted a link to how did you find pots that had a 16 inch with base?
It was a 20 inch pot that is pretty much the same width from bottom to top 🙂 Just from Lowe’s.
We completed this project last week and love how it turned out! One question though, where did you get those glass hanging candle holders? They’re gorgeous!
It’s so old I don’t even remember! Maybe Hobby Lobby?! This is similar:
https://rstyle.me/cz-n/edbxhjcn3px
Really great looking posts, and a wonderful idea. Thanks for sharing. I was thinking I’d have to put ugly posts in the ground, but the pots are a much more aesthetically pleasing and portable solution! Well done!
SurferDad in Encinitas
Thank you! Just make sure your base is wide to avoid tipping in the wind! We have a very windy backyard and they hold up well!
Hi, I found your post via Pinterest. Super cute project; I finished my string light DIY posts last night. But, I ended up scraping the L-brackets; the L-brackets linked above and the planter linked above didn’t work together (I found them both through your links; thanks!!). The L-brackets were too long once screwed into both sides of the post and didn’t allow the post to go all the way into the bottom of the bucket to be screwed down. I know the links were just examples, but I wanted to give that feedback for anyone using the same supplies in the future. Honestly, the quikrete set so quickly, the posts stood on their own after only a few minutes. For those attempting this project, it is super easy!
Love this!!!
In addition to Potato vines, what other plants can I use?????
Thank you for sharing!!
Coleus, creeping Jenny, Petchoas, Spikes for height!
I have 2 wooden wine like barrels that are 20 in wide, will these be okay to use?? Will the concrete leak out of the seems? Also , any other type of tall wood post be okay? The 4x4s seem so heavy.
Thanks!
I only have experience with what we used so I’m not sure! I’ve seen them made with the wood barrels. Just make sure the bottom is almost as wide as the top so it’s not tippy! It drys really quick, but I couldn’t say for sure about leaks. I would just make sure your post is cedar which holds up well outside.
Hi! Love this and am currently in process of completing my own set. Question regarding the cement aspect; we’re in IL where winters can be brutal. Wouldn’t these resin type planters have tendency to crack as the concrete expands with the changing temps or am I being overly cautious here? My other thought was to fill them with pea gravel, sand and dirt…thank you!
I’m in Wisconsin so winters are brutal here too. It didn’t crack last winter for us. It might crack if it falls over though. Ours tipped in a crazy storm that crushed trampolines and knocked over swing sets and grills, but other than that it has been fine! And we live in the country on a ledge where it’s super windy.
I’m originally from Wisco so definitely know how it gets there! Great to hear. I’m going to go with the concrete!
Love this idea! For the quickCrete did you end up using the whole bag for one planter or can it be used if making multiple?
We bought two 80lb bags and we used about 100lbs for one planter.
I really like your idea for a light support pole. Thanks for all the details on how to make it. I want to add some lights above my uncovered patio using this method but have one curious question: do you ever have a problem of birds sitting on the wires and pooping on your patio? If so, what did you do to discourage them?
I’ve never had birds sitting on the string lights 🙂 spiders like them, but we get our house sprayed and then you won’t see them!
Hey can you use large polyurethane style potters. I bought the “ CHILIPEPPAR” pots from IKEA that were pretty big. They’re
Height: 17 ¾ ”
Outside diameter: 19 ”
Inside diameter: 16 ¼ ”
Will these work? I guess. If it’s not a 4×4 I could use PVC and paint it or metal piping. Let me know your thoughts.
I don’t have experience using that type of planter for this project. But I don’t see why it wouldn’t work. The important part is that the planters are strong enough to hold the pull of the string lights and not blow over easily. So the more weight and width around the bottom the better.
What height 2 x 4’s did you use? We’d be connecting the lights with our house on two sides and would like to make them the same height as the eaves. We’d need 10′ poles. Is that doable?
We used an 8ft cedar fence post (it’s linked in the supplies list!) and also use the eves of our house for the other two sides! Make sure to use wood that’s meant to not rot out in soil. Cedar is great for outdoor projects 🙂
Any suggestions for anchoring the post in a pot that has a raised center? It’s like there’s an inverted cup at the bottom of the pot. That’s a challenge but the pots are large, resin and really pretty. Suggestions?
I only have experience making them this one way, but do you think they would hold with just the quick-concrete alone? You would have to hold the post in place while it dries.
Wondering if anyone has tried this in colder climates and if so, how did the pots hold up over winter? Did they crack or did you have to store them in the winter?
This is from a backyard in Wisconsin 🙂 I would suggest using resin which is resistant to all weather extremes. Like this one – https://rstyle.me/+iwYO2-6SJmSaQhkSabgzrA
I love it! I am planning a mini backyard makeover & I would love to recreate this. We are having some fencing installed soon too & I can’t wait to see how it all comes together.
This was a great help! I knew I did not want to use ugly home depot buckets! This gave me some good ideas! If someone lived in a high wind area, you could run a 12 -18″ piece of rebar into the pot vertically so that the other part is driven into ground. You could drill maybe 4 – 6 inches into your post first to fit the rebar. Then you might not need L brackets. All this is THEORY – ha ha! I would try to water seal the hole though for longevity. I plan to find some solar lights and do this for our place so I won’t have to run electric to the firepit. Thanks again!
Wade – StayAwhileInTexas – IG (my goal is to learn to use IG for 2025)
Great Ideas! The bigger the pot, the better for wind too! I ended up replacing this original pot with a much bigger one over the years.